How do you register for the TOEFL? It may seem complicated at first, but if you break it down it’s actually a quick and easy process. In this guide I’ll walk you through all the steps you need to take to register for the TOEFL, regardless of which country you’ll be taking the test in. I’ll also explain TOEFL registration fees, important tips to keep in mind, and what to do if you need to change or cancel your TOEFL registration.
How to Register for TOEFL Test Dates
Let’s dive right in! Follow these seven steps to complete your TOEFL registration. I’ve included screenshots to make the process easier to follow.
Note that this guide explains the TOEFL iBT registration process, but registration for the paper test is essentially identical. The key difference is that you’ll need to complete registration before the deadline for your chosen test date.
Step 1: Create a TOEFL Profile
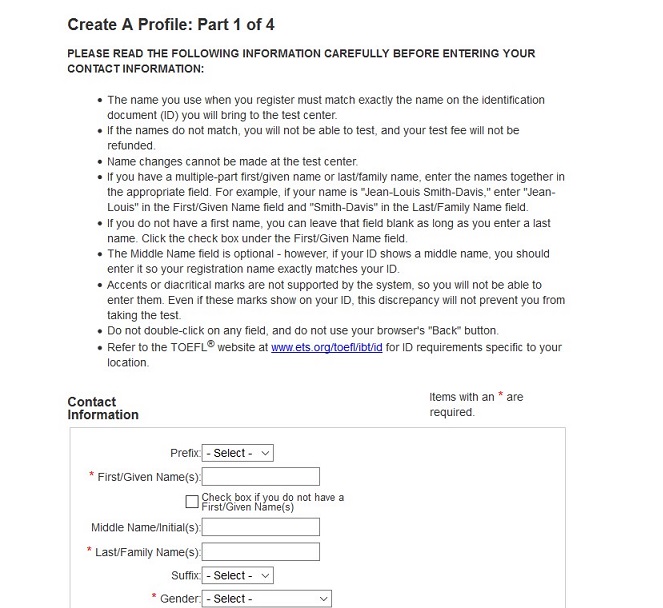
Your first step is to create a TOEFL profile. You’ll use this account to register for the exam, view your scores, and send score reports to schools. Creating an account is easy to do and mostly involves inputting some basic information such as your name, email, and home address. The most important thing you need to pay attention to is entering your name and birth date. Both of these must exactly match the ID you bring with you to test day, and you won’t be able to go back and change them after you’ve created your profile.
This is the first page you’ll see when you begin to set up your profile:
By the way: we have built the world's best online TOEFL course. Get online practice (TPO-sytle!) and individual grading and feedback on Speaking and Writing.
To be fair, it's possible to get a good TOEFL score studying alone. But PrepScholar is the world's most effective TOEFL course if you are worried about the TOEFL and are struggling to improve your score.
Learn how you can improve your TOEFL score by 15 points today.
Step 2: Begin TOEFL Registration
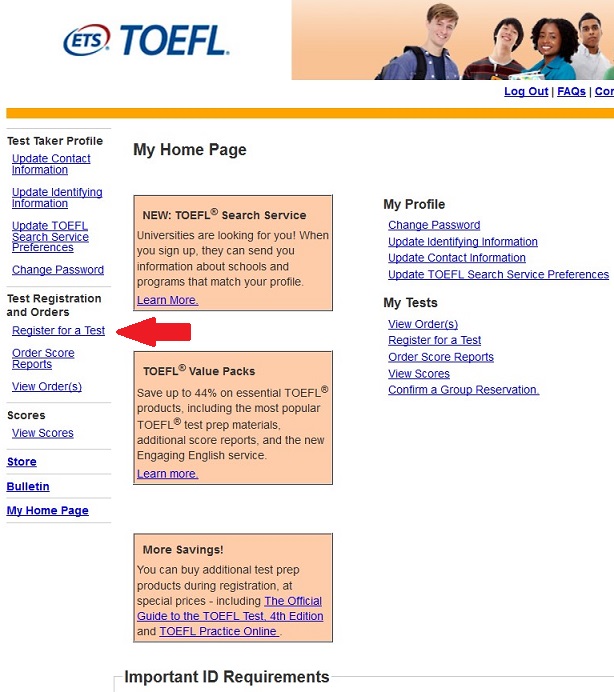
Now that you’ve created a profile, you can register for the TOEFL. On the main page (which you’ll be sent to after you finish your profile as well as every time you log in), go to the left side of the page and click “Register for a Test” (see the red arrow in the screenshot).
On the next page, select “TOEFL Test,” then read through and agree to the terms of service.
Step 3: Choose a Test Center and Date
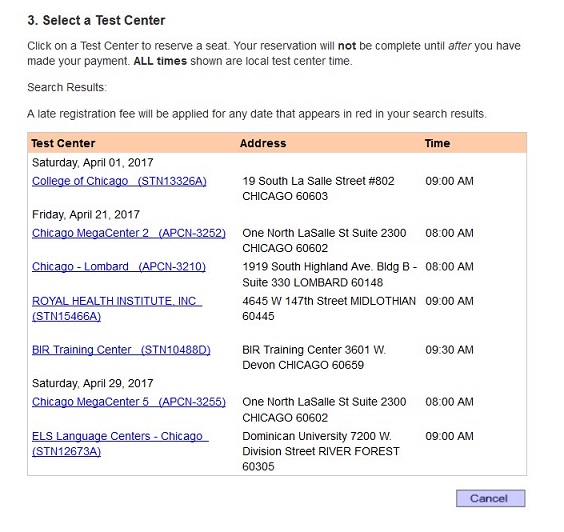
Next, select the country where you’ll take the TOEFL. Depending on where you’ll be taking the test, you may then also need to select the state and region/city where you plan on taking the test as well. You’ll then select the range of dates you’re available to take the TOEFL. This range can be anywhere from 1 to 60 days.
After you’ve entered your date range, a list of available test centers and test times will automatically be shown below. Each entry will show the date, test center name and location, and time of the exam. Below are the results after entering Chicago, IL, USA as the location and the month of April as the acceptable date range.
Step 4: ID Information and Score Reporting
After choosing and confirming a specific test center, date, and time, you’ll then enter the information of the ID you’ll be bringing to the test center. Be sure to enter this information correctly, since it must match the ID you bring on test day exactly or you won’t be able to take the TOEFL. Also be sure that the ID you’re using meets TOEFL’s ID requirements.
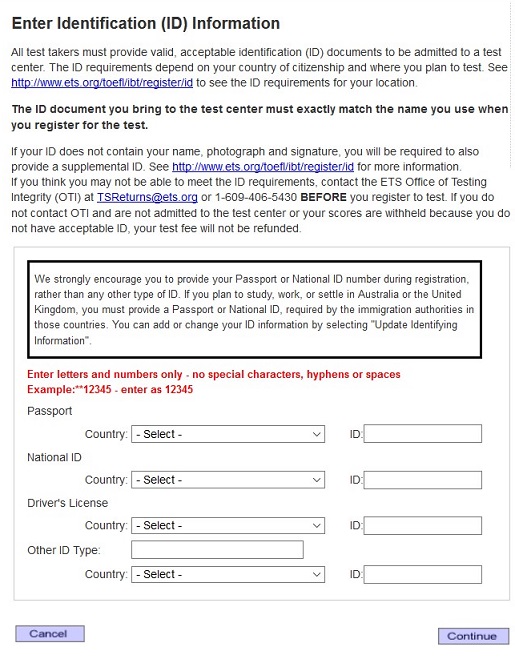
Next, you’ll choose whether you want to receive only an online score report or have your results mailed to you as well. (The prices for both are the same, so this just comes down to personal preference.)
Step 5: Selecting Score Recipients
On the next two pages, you’ll be selecting the schools you want to receive your scores. You can send scores to up to four schools free as part of your registration fee. To find the correct school, you can search by school name, institution code, or location.
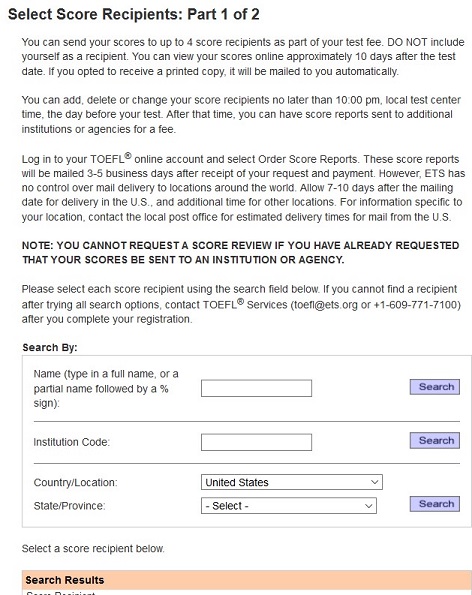
Step 6: Demographics and TOEFL Search Service
Next you’ll answer a few demographic questions (some required, some optional) then have the option to sign up for TOEFL Search Service, which matches test takers with prospective schools.
Step 7: Payment
You’ll now see a page that lets you add optional prep materials to your purchase. When you click to the next page, you’ll see an order summary with the total amount you’ll need to pay at the bottom. The TOEFL registration fee varies by country, but you can check their website to see estimated costs before registering. Your test date and location, as well as the schools you chose to be score recipients will also be shown so you can double-check them.
You’ll then confirm the order, choose a method of payment, and enter in your payment information. You can pay for the TOEFL with VISA, American Express, Discover, JCB, MasterCard and e-checks.
After this your registration is complete, and you’ll soon receive an email confirming it. You now know how to register for the TOEFL!
Does TOEFL Registration Differ by Country?
The examples I gave above of how to register for the TOEFL were for a US location, but there’s a good chance you’ll be taking the exam in another country. Fortunately, the TOEFL iBT registration process is pretty much the same in any country, with only a few exceptions.
If you’re taking the test in Mainland China, you’ll have a different TOEFL registration process and must register through the National Education Examinations Authority (NEEA). You’ll need to create an NEEA ID and password in order to do this (the NEEA website is available in both English and Mandarin).
Additionally, people taking the TOEFL in Benin, Côte d’Ivoire, Ghana, Kenya, Nigeria and Togo can only use a VISA credit card to pay for the TOEFL registration fee. No other forms of payment are accepted.

How to Solve 3 Common TOEFL Registration Questions
Registering for the TOEFL is usually a smooth process; however, you may find yourself in a situation where you need to fix something or get more information. In this section are three of the most common scenarios you may encounter, along with advice on how to solve them.
If You Entered Information Incorrectly
You can go back and edit most of your personal and contact information on your TOEFL profile, however; once you’ve registered for a test, you cannot change your name or birth date. Therefore, be very careful when entering these because they must exactly match the ID you bring with you to the exam or you won’t be allowed to take the TOEFL. For your name, this includes having correct accents, apostrophes, and spaces.
If You Need to Change or Cancel Your TOEFL Registration
If you need to change the date or location of your exam, or cancel it altogether, you can also do this on your TOEFL profile page. To reschedule your exam, log in to your TOEFL account, click “View Orders” on the homepage, then click “Modify” on the Order summary page. You’ll then follow a few steps to change the date and/or location of your exam.
It costs US$60 to reschedule your test, and this must be done at least four full days before your test date. (People taking the exam in Korea follow a different refund policy, which you can view here.)
If you need to cancel your TOEFL registration completely, you can do this by logging into your TOEFL account, clicking “View Orders” on the homepage, then clicking “Cancel” on the Order Summary page. Then follow the steps listed. If you cancel your TOEFL registration at least four days before your exam date, you’ll be refunded half of your original test fee. No refund will be given if you cancel less than four days before your test. (Again, Korea has its own refund policies.)
It’s also possible to change or cancel your registration by phone. To do this, contact your Regional Registration Center and be prepared to give your full name and registration number.
Want to improve your TOEFL score? We have the world's leading TOEFL course.
Built by world-class instructors from Harvard and MIT, the course offers individual review, interactive lessons, and realistic online praactice, at an affordable price! It's the fastest way to get your target TOEFL score.If You Want to Take the TOEFL Again
Many people choose to take the TOEFL more than once in order to get a score they’re happy with. The registration process for any retakes is the same as the first time you registered for the TOEFL. You can take the TOEFL as many times as you want, however; you have to wait at least 12 days between each test date.
Review: How to Register for the TOEFL
When you know the steps to follow for TOEFL iBT registration, it’s a clear and easy process. You’ll first need to create a TOEFL profile. After you’ve setup your account, you’ll be able to view test dates and testing center locations and register for an exam that fits your schedule. The TOEFL registration fee varies depending on which country you’ll be taking the test in.
You can also change or cancel your registration through your TOEFL account. Fees will apply for both of these processes. Also remember that you’re free to take the TOEFL as many times as you’d like, but you can’t register for two tests that are less than 12 days apart.
What’s Next?
Now that you know how to register for the TOEFL, do you need more information on how to send your scores to schools? Learn the six tips to sending your TOEFL scores by reading our guide.
A prep book can be your most useful study tool for the TOEFL. Learn what the five best TOEFL prep books are so you can start studying!
Not sure what TOEFL score you should be aiming for? Learn what a good TOEFL score is based on the schools you’re interested in.
Ready to improve your TOEFL score by 15 points?
Download our best TOEFL Strategy eBook (valued at $14.49) for FREE! Learn the top 5 strategies you must know to improve your TOEFL score. Download it for free now:
